Complete guide to installing Ubuntu Desktop 24.04.1 LTS using a USB flash drive
The latest Ubuntu currently is version 24.04.1 LTS; you can try installing it to experience how interesting the latest features of Ubuntu are, which continue to be developed. Ubuntu can be installed as a dual OS, meaning you can install two operating systems simultaneously on your PC: Windows and Ubuntu Linux. During the booting process, you can choose which operating system to use. This makes it easier to switch between them depending on your work needs
Below, Ninghuripdigital.com will share a step-by-step guide on installing Ubuntu using a flash drive. You can follow this method complete with installation process images and a video of the Ubuntu installation.
Requirements for Installation Ubuntu
To install Ubuntu, you need the following minimum hardware specifications so that Ubuntu can run smoothly without any slow performance issues. These specifications must be met before installing Ubuntu:
Minimum Hardware Specifications
- Processor: You need a dual-core processor with a minimum speed of 2 GHz or better.
- RAM: It's advisable to have at least 4 GB of RAM, but 8 GB or more will provide optimal performance.
- Storage Space: Make sure there is at least 25 GB of free space on the hard drive for installation.
- Graphics Card: Use a graphics card that supports a minimum resolution of 1024x768 or higher for a better visual experience.
Preparing the USB Flash Drive
Next, we proceed to the steps for creating a bootable Ubuntu Linux using a flash drive. Before that, you can first download Ubuntu Desktop 24.04.1 LTS with an ISO file size of 6 GB. Ensure the download is fully completed. Additionally, you will need Rufus to create a bootable Ubuntu for the flash drive as the installation media.
We still need Windows to create a bootable Ubuntu Desktop. If all files have been downloaded, proceed with the following steps:
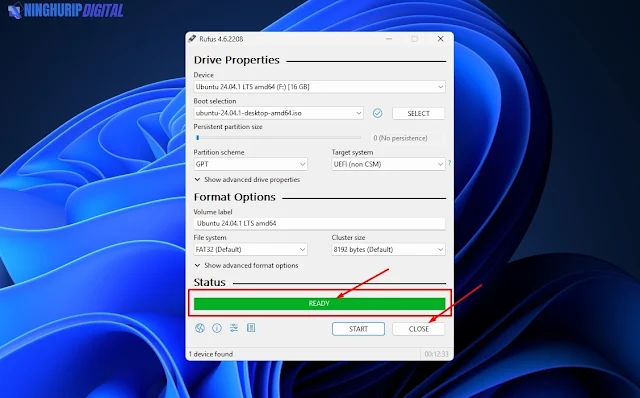
- Insert the flash drive into your laptop or PC, and open Rufus. The flash drive will be automatically detected in Rufus. Below is an example of the screenshot display.
- Click "Select" to choose the ISO file, then locate where you saved the Ubuntu ISO file and click "Open."
- Select the partition scheme GPT and the target system UEFI (non-CSM), click "Start"
- It will appear in Rufus that a hybrid ISO image is detected. Select "Write in ISO Image mode (Recommended)" and click OK, then click OK again.
- Wait until Rufus completes the process of creating a bootable Ubuntu Desktop on your flash drive.
- Once completed, the status section will display the word "Ready." Here, you are ready to install Ubuntu Desktop using the flash drive.
Booting Ubuntu from the USB Flash Drive
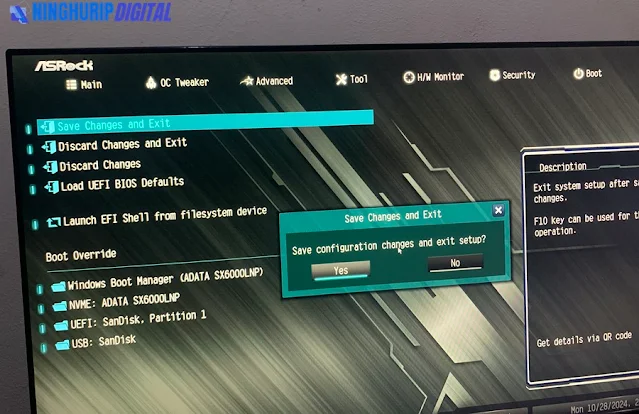
Next, we need to select the USB UEFI, which has had the ISO file added, as the primary boot device so that the flash drive becomes the main boot device. You can first enter the BIOS, then change the primary boot setting to the flash drive as shown in the image below.
Save change and Exit
Installing Setup Ubuntu Desktop 24.04.1 LTS
- If the booting has been configured to the flash drive, the Ubuntu loading screen will appear, preparing for the Ubuntu Linux installation.
- After waiting a few moments, the message "Preparing Ubuntu..." will appear. Wait until it advances to the next screen.
- Now, select the language for Ubuntu during the installation process. The language you choose will become the OS language for your Ubuntu. Choose "English" then click Next.
- In the "Accessibility in Ubuntu" section, leave the settings in default mode, then click Next.
- Next, you will be asked to choose the keyboard layout you are using. Select "English (US)" and click Next.
- If your PC or laptop is connected to the internet via LAN cable, choose "Use wired connection." If you have Wi-Fi, connect it first in the "Wi-Fi" section so that Ubuntu can install some software packages requiring an internet connection. Continue by clicking Next.
- Select "Install Ubuntu" and click Next.
- In the "How would you like to install Ubuntu?" section, choose "Interactive installation" to proceed with the manual installation configuration.
- Next, choose "Default selection" or "Extended selection" according to your needs.
- To install graphics and Wi-Fi drivers, it is recommended to mark the "Install third-party software for graphics and Wi-Fi hardware" and "Download and install support for additional media formats" options to support media like MP3, MP4, MOV, and others. Click Next.
- Then, you will be taken to the storage selection settings to choose which disk will store the Ubuntu OS. It is recommended to select "Manual installation" to create partitions manually, then click Next.
- First, select the disk free space you have created earlier, adjust the size, select "Ext4" as the format, and set the mount point to "/" (slash), then click OK.
- Now, create a swap area with an appropriate size, such as 2 GB, 4 GB, or 8 GB. Under "Used as" select "swap" and click OK.
- Ensure the selected disk is set to Ext4, then click Next.
- Create a Ubuntu account and make sure to set a password that is hard to guess. Remember this password for logging in to Ubuntu after installation is complete. Check the "Require my password to log in" box and click Next.
- Choose the time zone so your date, month, year, and time align with your location and timezone. Click Next.
- Now we are almost done with the Ubuntu installation setup. Click Install.
- Wait a few moments, usually around 20-30 minutes, depending on the specifications of the PC or laptop you are using.
- When the installation is complete, the message "Ubuntu 24.04.1 LTS is installed and ready to use" will appear. Click Restart Now.
- Finally, remove the flash drive so that Ubuntu can restart your PC or laptop and complete the installation process.
.jpg)
- Congratulations! You can now use Ubuntu!
.jpg)


.jpg)
.jpg)
.jpg)
.jpg)
.jpg)
.jpg)
.jpg)
.jpg)
.jpg)
.jpg)
.jpg)
.jpg)
.jpg)
.jpg)
.jpg)
.jpg)
.jpg)
.jpg)
.jpg)
Post a Comment for "Complete guide to installing Ubuntu Desktop 24.04.1 LTS using a USB flash drive"
Post a Comment